Friday, August 5, 2011

My First Circuit


I read some where that lighting up some LEDs with a battery is like the electronic version of "Hello World," so I thought it would be a good place to start.


When I built my computer way back when, the power light would not illuminate even though the machine itself was running. To be honest, I can’t even remember what I did to fix it, but when I turned the machine back on and that little LED indicator lit up, I felt a triumphant jolt that, was almost as intense as the one I felt at the thought that I build my first computer. Here was something that wasn’t working and I fixed it, without a manual or a software wizard or help from one of my techie friends. That memory still gives me a warm, fuzzy feeling so it’s nice to start this present endeavor working with LEDs again.

----------------------


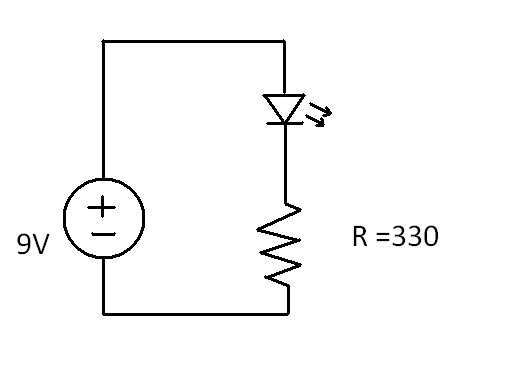
I’m using a 9 volt battery to power to power my first circuit. Since a single, red standard LED has a typical forward voltage (VF) of 1.7V, a 9V will easily blow out the bulb. To ensure that this doesn’t happen, I will use a resistor in my circuit. The formula for calculating resistor values is:
R = (VS - VL) / I
VS = supply voltage (the battery)
VL = load voltage (in this case, the LED is the load. Note that this is the same value as the LED’s VF)
I = LED current in amperes
R = value of the resistor, in ohms, that will allow enough current to pass to the LED without blowing it out1.
The LED current for my circuit is 30 milliamperes (mA), which converts to 0.03 amperes. In the case of my single, red LED, my calculation goes like this:
R = (VS - VL) / I
R = (9 - 1.7)/0.03
R = 7.3/0.03
R = 243.33 Ohms
Since I don’t have any resistors that are exactly this value, I would normally round up to the next higher value (270 Ohm). Unfortunately, my still-growing supply of electronic components lack even these (another trip to Radio Shack, anyone?), so I’ll use one of my 330 Ohms. (Note: if you want to skip manual calculations there are some pretty neat resistor value calculators out there2.)
Voila!


Remember to always have a resistor in place before powering an LED. I tried one circuit with just the battery and the LED and the bulb lit up for about a quarter of a second, went dim and started smoking.

Next time I’ll talk about wiring LEDs in series and in parallel.

Part List:

Breadboad
9V battery
9V battery snap connectors
1 resistor (270 Ohm for a single red or yellow LED; 330 Ohm for a single green one)
1 LED (red, yellow or green)

References:

1.) The Electronics Club: Light Emitting Diodes (LEDs)
2.) LEDZ.com: LED Resistor Calculator

Welcome to Electro-n00b


Hello, and welcome to Electro-n00b. My name is Liz and as the title states I am pretty much a complete novice to basic electronic hobby projects. This is not to say that I’m in the dark on all things technical: I enjoy tinkering around with both the hardware and software on my computer, but now I want to try something new.

I am still in somewhat of an exploratory phase and this blog will reflect that. Some of the things I will explore and talk about include:

-Circuits and projects I am working on
-Basic electrical concepts
-DIY electronic applications
-Hackerspace/DIY news and culture
-Impressions of electronic equipment/books/kits

This blog is primarily for those new to electronics such as myself who want to learn from the experiences of others. In the beginning, this blog won't be very heavy on the advanced technical stuff, though as my skills grow that will change. For now, I am more likely to point you to the most accurate resources rather than try to teach something I just learned five minutes ago.

I invite everyone to either comment on any posts they find interesting, or else drop me a line. Fellow n00bs, feel free to ask questions about anything you see or suggest topics you are interested in hearing more about.

Let’s have fun together!
Liz